- A+
R230 Printer Reset Software Tutorial
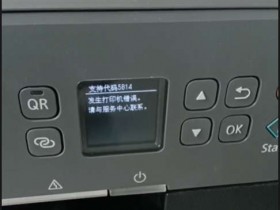
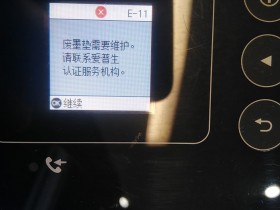
If you own an R230 printer, you might have experienced the dreaded "Service Required" error message. This error occurs when the printer reaches its printing capacity and needs to be reset. Fortunately, resetting your R230 printer is an easy process with the help of the R230 Printer Reset Software. In this article, we'll provide you with a step-by-step guide on how to use this software to reset your R230 printer.
Step 1: Download the R230 Printer Reset Software
The first step in resetting your R230 printer is to download the R230 Printer Reset Software. You can find this software online by searching for it on your preferred search engine. Once you've found the software, download it onto your computer.
Step 2: Extract the R230 Printer Reset Software
After you've downloaded the R230 Printer Reset Software, you'll need to extract it. To do this, right-click on the downloaded file and select "Extract All." This step will create a new folder that contains the extracted files.
Step 3: Connect Your R230 Printer to Your Computer
Next, you'll need to connect your R230 printer to your computer. You can do this by using a USB cable that is compatible with your printer. Make sure that your printer is turned on and ready to use before connecting it to your computer.
Step 4: Open the R230 Printer Reset Software
After you've connected your R230 printer to your computer, open the R230 Printer Reset Software. The software should automatically detect your printer and display its information on the screen. If the software doesn't detect your printer, make sure that it's properly connected to your computer and turned on before trying again.
Step 5: Select the Ink Pad Counter and Click Reset
Once the software has detected your printer, you'll need to select the Ink Pad Counter option from the menu. This option will allow you to reset the ink pads that have reached their printing limit. After selecting this option, click on the Reset button to reset your printer's Ink Pad Counter.
Step 6: Wait for the Reset Process to Complete
After clicking the Reset button, you'll need to wait for the reset process to complete. This process may take a few minutes, so be patient and don't turn off your printer or disconnect it from your computer. Once the reset process is complete, the software will display a message indicating that your printer has been reset successfully.
Step 7: Turn Off and On Your R230 Printer
The final step in resetting your R230 printer is to turn it off and on again. This will ensure that the reset has been successful and that your printer is ready to use. After turning your printer back on, you should see that the "Service Required" error message has disappeared, and your printer is now functioning properly.
Conclusion
Resetting your R230 printer with the help of the R230 Printer Reset Software is a quick and easy process that can save you time and money. By following the steps outlined in this article, you'll be able to reset your printer without needing to take it to a service center or purchase a new printer. If you encounter any issues during the reset process, make sure to consult the software's documentation or contact the software's support team for assistance.